On OOTD – Wedding Mint:

Congratulations to my beautiful friends, Michael and Emily who were married August 9th 2014! I wish only amazing things for both of you guys!

I decided to finally do a blog post on the outfit I was able to wear to the wedding, which my mom made (and finished an hour before I had to go…)

Happy Weddings!

Mint green hi-lo dress with a sweet heart neckline & matching flower hair piece | Made by my beautiful and talented mom!

Yup. You read that right.

Accessories:

Faux diamond earrings |Spring | $10
Nude pumps | Payless | $24 (On sale for $18)
Black bracelets/necklace| Gifts

Photos by | Lucas Gilbertson

Enjoy!

| danielle

Spring DIY: Bike Basket

DSC_0183
I am so ready for Calgary to experience spring weather again; it feels as if our winters get longer every year! Now that we’re finally edging toward the finish line, I thought I might as well start ushering in spring with a DIY project for my bike!

DSC_0126
Supplies:

  • Basket (I bought mine at Walmart for about $10 – I realized afterward that it was a bit big for a front basket, but still functional. I actually might use it on the back of my bike going forward!)
  • Hot glue gun
  • Fake flowers (These are everywhere, but cheapest at the dollar store. I originally planned on using several different types of flowers but ended up just sticking to daisies – they suit me much better!)
  • Ribbon (For the way I’ve done this, the ribbon is visible so I chose a colour to match my bike!)

Step One: Pluck off all your fake flowers from their stems. They pop off easily but I realize that may be because I bought dollar store ones. If you happen to buy flowers of better quality and are having difficulties, I’m sure you could cut them off the stem with a pair of scissors! Make sure to leave a couple centimetres of stem so it’s easier to stick in the basket!

DSC_0146

Step Two: If you have several different types of flowers, organize them into an arrangement before you start this step. If you are haphazardly sticking flowers all over your basket as I did, then you can start with gluing right away! Use your hot glue gun first on the actual flower stem – apply glue liberally to avoid having your flowers fly off mid-ride. Before the glue dries, stick the stem into a spot on the basket and apply pressure. Add some extra glue on the sides afterwards if it looks necessary.

DSC_0156

Step Three: Continue gluing and placing until your entire basket is covered to your satisfaction! I only have flowers on the front and sides because I was planning on having the basket on the front of my bike. However, now that I’ve decided I might put it on the back instead, I’ll have to cover all four sides!

Step Four: Use the ribbon to tie your basket onto the handle bars. I’d suggest double-knotting and checking the knot before each use just in case! In the photos, I’ve tied the ribbons right on the top edge of the basket. However, I decided to re-tie them afterwards about 2 inches down from the top edge – this will just help to avoid drooping once you’ve actually put things in the basket!

DSC_0188

That’s it! This project was so easy and quick to complete – I’m definitely going to buy another basket (or two) so I can make more! Since these baskets are so easy to attach and remove, it’ll be nice having a couple to choose from – especially since the one I’ve made here is actually the perfect size for the back of my bike!

I hope this tutorial adds a bit of sunshine to your day and gets you even more excited for spring! Happy Tuesday, everyone!

| alex

A Peek Inside Our Adventure Books

ABF
I’ve always had a deep fear of forgetting. It’s never been about leaving my keys in the car or getting to the grocery store and not knowing why I went in the first place. It’s not even about studying for weeks for an exam and then having everything fall out of my head as I sit down at my desk. It’s about those 4 a.m. heart-to-hearts with my best friend, when I get home as the sun is rising and I crawl into bed feeling like my life is finally changing for the better. It’s about those early mornings with the love of my life, when the sunlight is kissing his face and I feel like the luckiest girl in the world because I’m the one who gets to trace my fingers along his cheek and look at him one last time before I drift back to sleep. It’s about those warm summer nights with my closest friends, when we set off fireworks and sit around campfires and I look around at the people I’ve chosen to surround myself with and my heart swells with gratitude. I can’t bear the thought of forgetting moments, people, places that once meant the world to me. It’s why I used to write in my journal so often and why I’m trying to do so again. And it’s why I’ve always loved taking pictures.

Adam and I have been together for two years (as of this Saturday, actually!) and it has been a complete whirlwind of an experience. I have never been happier alongside another human being, never had someone who understood me so completely and cared for me so deeply. At a time in my life when I’m uncertain of so many different aspects of my future, I feel an incredible amount of comfort knowing that I can count on him being a part of it. I never want to forget a moment of our time together; everything from backyard camping to nights we did nothing but play our Nintendo DS’s mean the world to me. When we first started dating, we decided we would always go on adventures together and that we would keep books to document them (à la Up). I envision our future home with numerous bookshelves, at least a shelf or two dedicated to keeping our adventure books tucked inside them. We have two completed ones so far, containing things like photos, ticket stubs, and notes written to one another. There are so many opportunities to be creative and try new things: we used a sketchbook for our first adventure book, Adam made our Vietnam one, and we’re using a binder and inserts for our third. Although we occasionally fall behind on keeping them updated, they’ve been wonderful to have and to look back on. I thought I would share them in an effort to inspire those of you who have a similar appetite for memory-keeping!

I love that we’ll always have our adventure books to remind us of all the things that, no matter how small, brought us together and made us who we are. I hope this sparks a little bit of creative memory-keeping in some of you today! Happy Wednesday, everyone!

| alex

DIY: No-Sew Flag Garland

Garland9

Flag garlands are one of my favourite types of summer party decorations — they just add the perfect amount of charm and playfulness to any get-together. Although it isn’t quite yet the season for backyard barbecues and pool parties, this project is a quick and easy way to bring a little bit of sunshine into your home! Whether it’s for a special celebration or for day-to-day decorations, this is a perfect project for those of you who may be short on time, aren’t great with a sewing machine,  or have some extra scrapbook paper laying around!

Garland1

Supplies:

  • Scrapbook paper
  • String (I used hemp string, but baker’s twine – or any thicker/braided string – works just as well!)
  • Scissors, tape, and a pencil

Step One: Trace out a triangle shape on your scrapbook paper. You can use a ruler or any other straight-edged object to do this. I decided to make all my triangles the same size, but I’ve seen some lovely flag garlands with triangles of all different sizes as well!

Garland2

Step Two: Use your scissors to cut out the triangle you’ve drawn on your scrapbook paper. After you’ve finished the first triangle, you can use this one as a stencil for the rest of them!

Garland3

Step Three: Place three pieces of tape onto the top of your triangle and fold over toward the back, securing the triangle to your string. I found that the tape was practically unnoticeable, even though I hadn’t made an effort to hide it. If you prefer to have no tape showing, you can instead  just use one long piece of tape on the back of the triangle to secure the string.

Garland4

Garland5

Step Four: Repeat these steps so that the triangles cover the length of the string you’re using (remember to leave some space at the ends for hanging it up)! I placed all the triangles directly side-by-side but they look quite nice if you leave space in between them as well!

Garland6

That’s all! Depending on how long you need the garland to be, or how many you’re making, this project can take you as little as 15 minutes to complete! I’m also big on multi-tasking so this project was perfect for me – I sat down with my supplies, a cup of coffee, and an episode of Modern Family and really enjoyed the time I took to complete it!

Garland8

Garland7

I’m so happy with my garland – it’s such a charming little piece of decoration and it can be made with so little time! I hope you get a chance to give this project a try! Happy Tuesday, everyone!

| alex

DIY: Tea Shelf

Tea Shelf 1

I’m constantly wanting to redecorate the rooms in my house. Most recently, I’ve been working on the office beside my bedroom (which was practically a room-sized junk drawer) and turning it into my new study. I don’t know about you guys, but whenever I have a book in hand, a paper to write, or anything to study for, I always need a hot beverage. I also always love a good do-it-yourself project. So what better addition for my study space than a tea shelf! Here’s a project for those of you who love simplistic storage, mason jars, and tea just as much as I do:

What you need:

  • a shelf – preferably one with concealed mounting (I purchased this one from Ikea)
  • mason jars – I used three large and three small (I purchased these ones from Walmart, but they’re also available at dollar stores)
  • hooks (I bought a pack of two, similar to these ones from Walmart – just make sure they’re no longer than the shelf is thick)
  • screws (Available at any hardware store – again, make sure they’re not too long)
  • a drill, tape measure, level, and stud finder

Some things to note:

  • this is not an advanced project, but does require the knowledge of how to use some basic household tools (drill, stud finder, etc.)
  • I’m not great with those aforementioned tools, so my boyfriend helped me with this project – I’m sure it’s more than possible to complete this on your own, but consider your abilities and ask for help if required. It’s more fun to do these things with someone else anyway!
  • Unfortunately, I put this together a few days ago before I considered the possibility of me having to write about how I did it. I’ve taken photos of the finished product, but not of the process. However, that will definitely be a feature in future DIY posts.

Tea Shelf 3

Step One: use the measuring tape and a pencil to lightly mark on the shelf where you would like your mason jars and mug hooks to go. We positioned them closer to the front half of the shelf so they’d be easier to access; 5 inches apart from one another and the outermost screw/hook were 3 inches from the edge of the shelf.

Step Two: use a pencil (or sharpie) to mark where you’ll be drilling on the bottom side of the mason jar lid. We just eye-balled where the middle of the lid was – if they were off a bit, there was no way to tell once everything was finished!

Step Three: drill pilot holes into the markings you’ve made on the shelf for your screws and hooks. For the mason jar locations, use a drill bit much smaller than the screw being used (we used 5/64) – these pilot holes will just make it easier for you to guide the screw into the right spot. For the mug hook locations, also use a smaller drill bit but make sure that the hole will be big enough for the hook to be screwed into and small enough so it won’t fall out. We just eye-balled the size we’d need, used a 3/32, and they ended up fitting perfectly!

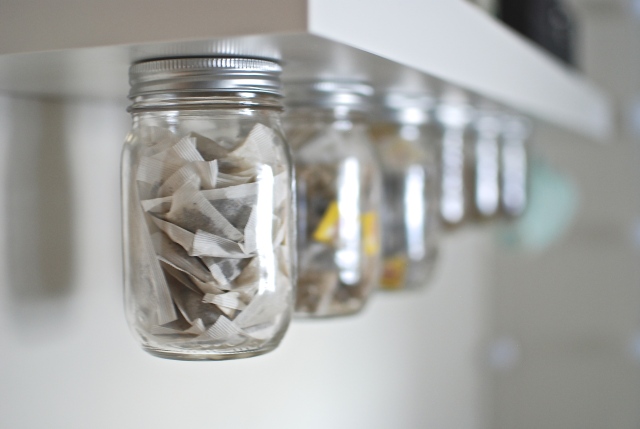
Step Four: drill pilot holes into the markings you’ve made on the mason jar lids. We found the easiest way to do this was to place the plate of the lid upside down and then seal it onto the mason jar with the screw-on part of the lid. The mason jar provided support and a hollow space under the lid for the drill to go through!

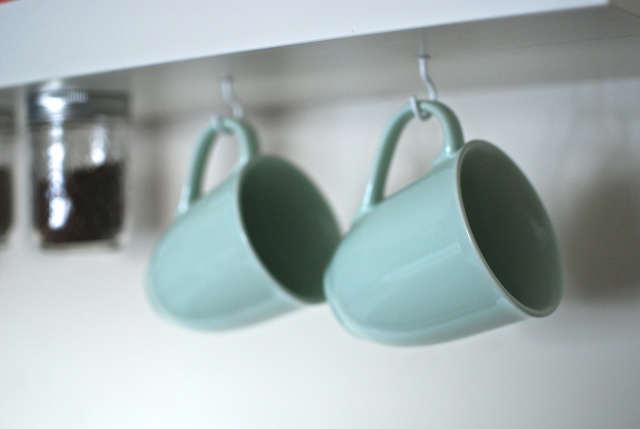
Step Five: drill the screws through the pilot holes in your mason jar lids and then screw the lid onto the shelf – remember to drill the top part of your lid to the bottom side of the shelf! You can now also screw in your mug hooks if you haven’t already!

Step Six: mount the shelf to the wall. Ikea is notorious for having quite difficult (or possibly over-simplistic) instructions. However, I found that the ones for the shelf were relatively easy to follow. Use your stud finder, tape measure, level, and a pencil for this step! (Note: the instructions stated that we only needed to find one stud for this particular shelf, however we felt more comfortable using two.)

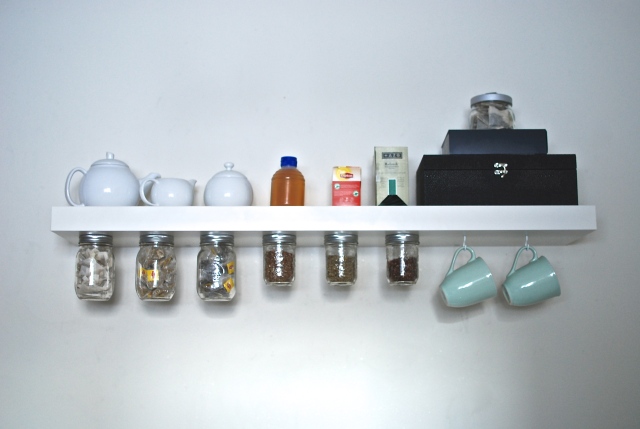
Step Seven: Once you’ve got your shelf on the wall, fill all of the mason jars with your favourite teas and choose your best mugs to hang on the hooks! I used the top of my shelf for my teapot, sugar, honey, and extra tea storage! I also bought a small, inexpensive tea kettle that I think I might keep up there as well!

Tea Shelf 2

This project was definitely a learning experience for me, having known very little about using basic household tools before (embarrassing, I know). But I am so happy with the finished product! I hope that you find this tutorial helpful, despite the many words and lack of step-by-step photographs, and that you decide to give it (or your own variations of it) a try!

| alex